Obtaining and saving family history search information such as for certificates, photographs, source information and so forth is a commonly performed task with family history work. The best option is to actually download a copy of the item we want. Where items can not be downloaded, screenshots are the next best thing. Creating the best screenshots however requires a bit of knowledge on how to do so. We'll go into further information below.
Always try to download the image if possible. You are much more likely to get a higher quality image. You may not see a “Download” button, but if you right click on images, a menu option will appear that will often allow you to download the image. Look for the “Save Image As …” option as in the example below. Create a name for it, and save it to your desired location. There will be times that internet images are blocked from download due to permissions being blocked by the submitter.
Screenshots are easy to do WITHOUT any additional software applications. There are plenty of apps out there, like FastStone Capture, Snagit, FireShot, etc that are free or cost a few dollars, however in reality they really don’t offer much more benefit than the built-in Windows or Mac applet.
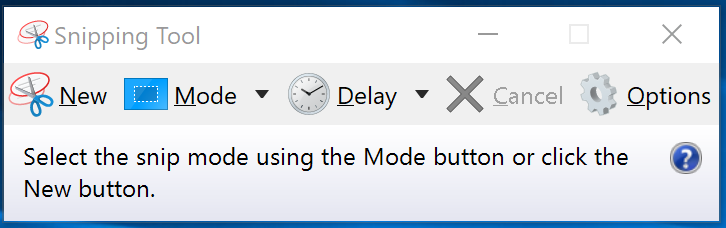
Windows 11 has a built-in applet called “Snipping Tool” that works quite well and is very simple to use. Once a screen capture has been done, you can save the image to disk.
MacOS uses keyboard shortcuts like Shift + Command + 4 to capture a portion of the screen. These keyboard shortcuts can be easily modified to what you would like to use. I have mine set for Command + 1 to save to the clipboard, and Command + 2 to save to an actual image file.
Traditional monitors display 72 pixels per inch. Apple Mac screens typically display 144 pixels per inch. The resulting screen capture quality on a Mac display contains twice the pixels and will therefore produce a larger and better quality capture.
If the item you are trying to screenshot is small, say a ¼ of the full screen and you take a screenshot, you will find that there will be moderate to significant pixelation when you try to enlarge or zoom in on the image. Therefore, make the image as LARGE as you can on the screen before capturing the screenshot.
The image on the left below was captured from a small image size and then displayed zoomed in a little. You can see the pixelation occurring already with it. It would make a poorly readable document copy if you ever wanted to print it. The image on the right was captured at mostly full screen. It could easily be increased in size without much reduction in readability.
In Summary: Screenshots are a great way to save those images that you find on the internet, however ALWAYS try to download the image if you can. If you can not, then maximize the size of the image to as much of the computer screen as possible before you capture the image. If you have any questions about this post, feel free to contact me.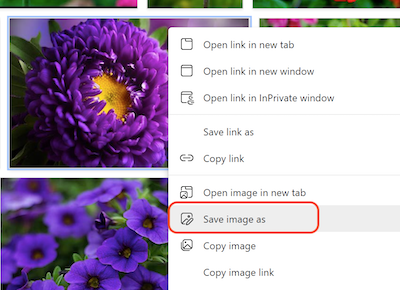
Items to consider when doing screen captures:

Have Fun With Screenshots!
Capturing and Saving Browser Images
By Stephen Meyers — Published: 17 March 2025